


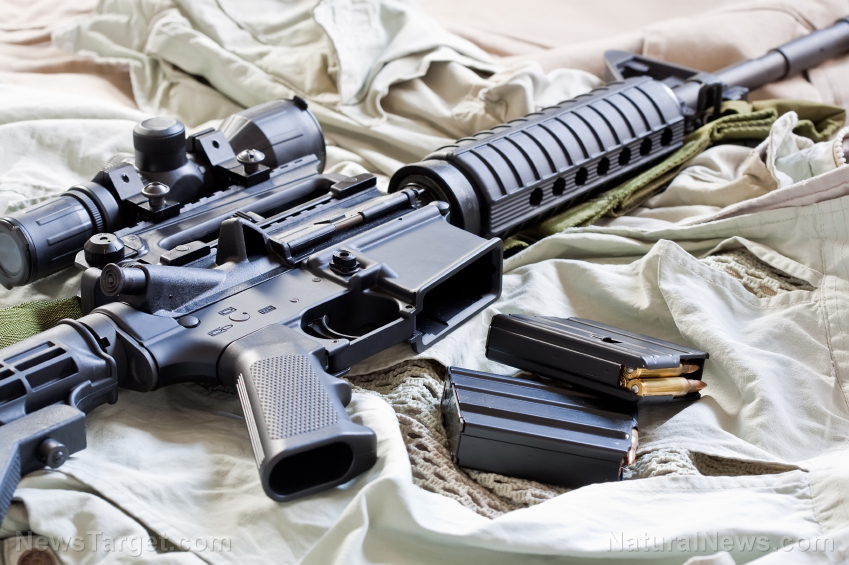
Cleaning and lubricating a rifle is one of the most important things an AR-15 owner should learn. Keeping your rifle clean is more than just a matter of vanity; it can greatly affect how your rifle performs and even keep it from jamming at inopportune times. (h/t to AskAPrepper.com)

Why you should clean your AR-15
The need to keep your AR-15 clean comes from how it works. Most AR-15s use a system called “direct impingement.” Here, high-pressure gas from firing a cartridge is directed via the gas tube directly to the rifle's bolt carrier to operate the breech. In contrast, most other rifles -- including some modern AR-15s -- use a piston that the gas pushes to operate the breech.
The advantage of a direct impingement system is that it saves weight since it doesn't use a piston. This can make rifles using this system more accurate than those using a piston.
The disadvantage of a direct impingement system, however, is that its design causes carbon from the hot gasses to build up in the gas tube and bolt carrier group. This build-up will eventually cause the gun to foul and jam. In addition, any dirt that gets inside these parts will also contribute to fouling.
The average civilian owner may not be firing his AR-15 often enough to need to worry about carbon build-up. However, for preppers, cleaning your AR-15 will make sure that it's ready and able to fire properly in case of a survival situation.
How to clean and lubricate your AR-15
Before cleaning your AR-15, make sure you have all the items you'll need on hand. While you can go out and buy a dedicated cleaning kit, you don't need anything fancy to clean your rifle. Just having some an old rag or some paper towels, some cleaning solvent, an old toothbrush, as well as some cotton swabs or Q-tips, should be fine. The only specialized equipment you would need is a cleaning rod and its accompanying attachments. (Related: Important advice for first-time GUN buyers (especially women).)
What you will need for lubricating the gun is some good-quality lubricant. Some of these will come with an applicator tip. If not, you can use either a syringe or Q-tips instead.
Field stripping and AR-15
Stripping any AR-15 involves separating the upper and lower receivers. These are held together in place by a pair of pins: the pivot pin in front of the magazine well, and the takedown pin just above the grip.
Take out both takedown pins to separate the receivers. With the receivers separated, you can remove the bolt carrier, as well as the charging handle from the upper receiver.
The bolt carrier consists of a number of parts that need to be disassembled for cleaning. To disassemble this, first, remove the firing pin retaining pin. This is a cotter pin that goes into the bolt carrier from the side. You can insert any sharp tool into the head of the cotter pin to remove it.
Once the retaining pin is removed, the firing pin can be removed by turning the bolt carrier vertical, with the bolt facing upward -- the firing pin will simply fall out.
After doing this, remove the cam pin from the bolt carrier. This is hidden under the gas feed tube and has a rectangular head. Turn it 90 degrees and slide it to the end of the slot so that its head is out from under the gas feed tube. With this, you can now slide it from the bolt carrier.
Cleaning the bolt carrier group
The bolt carrier group has the most important parts to clean in an AR-15 because they're constantly exposed to gases from firing, meaning that carbon will build up.
With the individual pieces of the bolt carrier group disassembled, you can either soak them in cleaning solvent or wipe them with a rag with some solvent. You can also use an old toothbrush to remove carbon from the many holes and crevices in these parts.
The charging handle, which you took out along with the bolt carrier can be cleaned in the same manner.
Be sure to check the extractor mounted on the side of the bolt. Should it need cleaning, you can remove it by pushing on the extractor pin with a small pin punch.
Once the bolt carrier group's parts have been cleaned, reassemble them by simply reversing the steps used to take it apart.
Cleaning the barrel
To clean the barrel, use a cleaning rod. This comes with a number of different tips you can use, depending on the situation. The one you will use the most is the patch holder, which can hold cleaning patches that you can soak in cleaning solvent, and the brass brush.
Run the cleaning rod with a soaked cleaning patch through the barrel from the breech end -- the part in the receiver. Run the patch through the barrel, removing it from the rod before withdrawing the rod back down the barrel.
Once this is done, replace the patch holder with the brass brush and brush the barrel through several times. Brush the barrel through from the breech end to the muzzle end.
Switch back to the patch holder and a fresh patch soaked that's been in solvent. Run it through a couple of times, then switch out to a fresh patch that has not been soaked. Keep running it through until you're sure that there's no more solvent residue in the barrel.
Cleaning the upper receiver
Carbon residue commonly builds up in the upper receiver from firing. This is especially true for traditional, direct impingement models.
While the upper receiver's design makes it difficult to get to certain parts, you should be able to reach these with an old toothbrush or a rag soaked in solvent.
Cleaning the trigger control group
Unless dirt has somehow gotten into it, the trigger control group does not require any cleaning or maintenance. If you do need to clean this part, it's best to do so with compressed air.
Simply blow out any dirt you see in the trigger control group. You can also use a small paintbrush and a bit of solvent to clean it.
It is not recommended to disassemble the trigger control group unless you've been trained on how to do so.
Cleaning the outside of the gun
The exterior furnishings of your rifle are the least important thing to clean. That said, you shouldn't ignore cleaning the outside, especially since this is the part of the rifle that's subject to the most wear. It's also the part most likely to develop rust.
You can clean the exterior of your AR-15 sufficiently with just a soft cloth that has had some cleaning solvent sprayed into it.
For a bit of extra protection, you can use a silicone impregnated cloth. These will leave a layer of silicone lubricant on your gun. Not only is this highly resistant to wear, but it can also protect it from extreme temperatures.
Take note that you will have to wipe down the gun again, after wiping it with the silicone impregnated cloth, to get rid of excess lubricant.
Lubricating the rifle
Lubricating an AR-15 must be accomplished while it is being assembled. Your goal is to provide a thin layer of oil on any parts that rub against each other. The oil will reduce the wear on these parts, helping your gun last longer while also maintaining its accuracy.
Some gun lubricant can be bought with an applicator tip; however, if what you have doesn't come with one, you can use a syringe or even Q-tips to apply the lubricant.
The most important part to lubricate is the bolt carrier group. To lubricate, first extend the bolt as far as it will go while assembled. Place a small bead of the lubricant where the bolt meets the bolt carrier. Also, place one drop of oil in the opening for the cam pin and a small amount of oil in the gas escape. Run the bolt in and out to spread the lubricant around.
The AR-15's trigger control group normally isn't oiled. Some users, however, do provide a bit of lubrication on these parts. Take note that excessive lubrication in the trigger control group will attract dust, which will stick to the lubrication.
Before reassembling the rifle, lubricate the buffer tube. Apply a small amount of lubricant to the inside of the tube and use a finger to wipe the lubricant around the tube.
The final bits you need to lubricate are the charging handle and the pins. Lightly lubricate these parts with a bit of oil. For the pivot pin and takedown pin, wipe out any excess lubricant to avoid dirt sticking outside the rifle.
Reassembling the rifle
To reassemble your AR-15, first make sure that the buffer spring is installed and that the face of the buffer is past the face of the buffer detent.
Place the charging handle back into its slot in the upper receiver. Then, place the gas tube on the bolt carrier into the underside of the charging handle. Slide both parts until the charging handle locks into place. At this time, the lugs on the bolt's face should be interlocked with those in the breech as well.
Mate the upper and lower receivers together at the holes for the pivot pin. Slide the pivot pin home to hold them. After this, swing both halves of the rifle closed, rotating on the pivot pin. Push the takedown pin in all the way to seal it. Check both pins and wipe away any excess lubricant.
You have now properly cleaned and lubricated your AR-15.
Sources include:


Please contact us for more information.