


When facing a survival scenario, knowing how to build a shelter means you can protect yourself from the elements. A shelter will also provide warmth on a cold night.
Before SHTF, learn several primitive ways to build a shelter. (h/t to AskAPrepper.com)
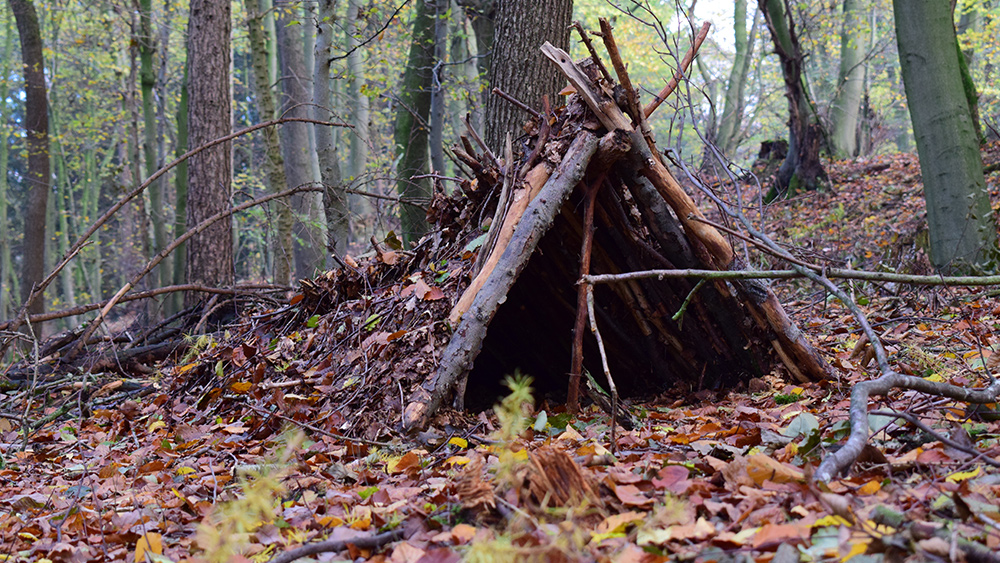
Debris hut
If you're a beginner, start with learning how to build a debris hut. This shelter can be built using only natural materials.
You will need sticks, leaves and other resources from your surroundings. While not as sturdy as the other shelters on this list, a debris hut offers reliable protection from the elements.
If your debris hut is built properly, you can use the heat generated by your body to maintain a comfortable temperature between 96 F (37 C) and 100 F (38 C).
A debris hut is ideal for regions with mild climates and it can protect you from wind and snow. (Related: 10 Survival skills everyone needs to know.)
To make a debris hut, you will need:
- Sticks and branches
- Bark, grass or leaves
- Pine needles and moss
- Rocks or logs
How to build a debris shelter
- Collect many sticks and branches. They must all be long enough to form the framework of your shelter. You need at least four feet (1.2 m) of debris to make a decent shelter.
- Place one stick horizontally against a tree or stable object. This will act as the roof ridge pole.
- Connect two more sticks to either side of the ridge pole. Use large rocks or logs as anchors. This will form the triangular shape of the debris shelter.
- Add extra sticks along the sides and connect them to the ridge pole and anchors. This will give the shelter more stability and support.
- Create an insulation layer around the structure. Use bark, grass or leaves to form a barrier between you and the cold ground.
- For extra insulation, stuff pine needles and moss between the sticks.
- Place large rocks or logs around the edges of the shelter to secure it.
- Leave an opening for your shelter if you want to. Cover it with a blanket or tarp to keep the warmth in and the rain and wind out.
Human knowledge is under attack! Governments and powerful corporations are using censorship to wipe out humanity's knowledge base about nutrition, herbs, self-reliance, natural immunity, food production, preparedness and much more. We are preserving human knowledge using AI technology while building the infrastructure of human freedom. Use our decentralized, blockchain-based, uncensorable free speech platform at Brighteon.io. Explore our free, downloadable generative AI tools at Brighteon.AI. Support our efforts to build the infrastructure of human freedom by shopping at HealthRangerStore.com, featuring lab-tested, certified organic, non-GMO foods and nutritional solutions.
Lean-to shelter
A lean-to shelter is ideal if you are only spending one night outdoors. This shelter will protect you from strong winds or rain since the open side can be oriented away from those elements.
A lean-to shelter isn't as stable and comfortable as other shelters, but it is easy to build and doesn't require too many materials to construct.
To make a lean-to, you will need:
- 2-3 Sturdy logs for the frame
- Rope, paracord or natural fiber for tying the logs together
- A tarp or poncho to cover the frame
How to build a lean-to shelter
- Gather two or three logs for the frame. Place them on the ground in a "V" shape.
- Secure the three logs with rope or plant fiber.
- Raise the frame until it stands upright. Keep the open side facing away from strong winds or rain.
- Place a tarp or poncho over the frame to form the roof of your shelter.
- This step is optional, but you can add another layer of tarp or a blanket for extra insulation.
- Add leaves and grass for additional insulation and an extra layer of protection from the elements.
- After completing the shelter, test it and adjust as needed.
Tree root shelter
A tree root shelter is ideal if you don't have a lot of time to build your shelter. It also doesn't require a lot of energy and resources.
To build this shelter, you need to dig out the area around tree roots and leverage their structural support. A tree root shelter will provide dependable protection from the elements.
If you find a tree that has fallen in the area, use it as a tree root shelter by excavating the roots sticking out of the ground.
This shelter is also ideal if you are bugging out in an area with high moisture levels.
To make a tree root shelter, you will need:
- A tree with its roots sticking up from the ground
- Shovel or your bare hands for digging
- Sticks and branches for support
- Leaves and grass for insulation
How to build a tree root shelter
- Look for a tree with exposed roots. This will be the foundation of your shelter.
- Dig by the area around the roots to make room for the shelter.
- Make the shelter easier to access by creating an entrance. Dig a trench from the tree roots to the outside of your shelter.
- Use sturdy sticks and branches to form a frame around the base of the tree roots. This will provide extra support and stability and help give the structure additional strength and insulation.
- Cover the shelter with a thick layer of leaves and grass. Plug any holes or gaps that may let in the rain or wind. Add leaves and grass for camouflage.
- If you are building the shelter in winter, add extra insulation by adding a layer of foliage or dirt around the outside of the shelter.
Wickiup shelter
A wickiup shelter is a teepee-designed shelter built off of a tripod made from branches.
It was once used by Native Americans and can stand up to all kinds of conditions. The teepee frame of the shelter is insulated with lots of leaves. You can use forest debris to cover the entire exterior of the shelter.
A wickiup will provide enough protection from the sun and rain and offers good ventilation.
A wickiup shelter takes longer to build because you need to look for materials that you will need to weave together.
Build a wickiup if you need shelter for two or more people.
To build a wikiup shelter, you will need:
- Sticks and branches
- Canvas, tarps or natural vegetation
- Twine or natural fiber
How to build a wickiup shelter
- Forage for sticks and branches of varying lengths. Collect at least 15 or 20 sticks for the frame of the shelter.
- Arrange the sticks into a circle and use at least four to five longer logs for support.
- Secure the frame together with rope.
- Weave the remaining sticks and branches into the frame. Cross them as you go to make them strong and stable.
- Once the frame is complete, cover it with canvas or natural vegetation like grass and leaves. Tie the canvas tightly together at the bottom.
- If needed, add extra insulation from the elements by adding more leaves inside the shelter.
- Test the wickiup shelter before using it and adjust as needed.
Before disaster strikes, learn about primitive methods that you can use to build a temporary shelter like a lean-to or wickiup shelter so you can protect yourself from the elements.
Watch the video below to find out why you need an emergency sleeping bag in your bug-out bag.
This video is from the Bashiru channel on Brighteon.com.
More related stories:
How to build an emergency shelter with a tarp.
Even regular people are now constructing bunkers due to fears of a nuclear war.
Fortitude Ranch: A vacation resort that turns into a survival community when SHTF.
Sources include:


Please contact us for more information.